
Review: Simplicity 8891 - A Summer Suit with Baby Lock Aventura II Decorative Sewing!
12:00 PM

I'd always wanted a sewing machine with the embroidery feature and lots of good decorative stitches. I had a lower end, big box model in the past. But it just wasn't advanced enough for my liking and I never gave it more interest than adding a design or so to my linings in coats and jackets. When I got my Baby Lock Aventura II a few weeks ago, I was determined to learn about embroidery from the ground up... starting with the decorative sewing. I did my research because I wanted to use decorative sewing and embroidery in a sophisticated and polished way. I want my garments to look high-end and not like a craft project.

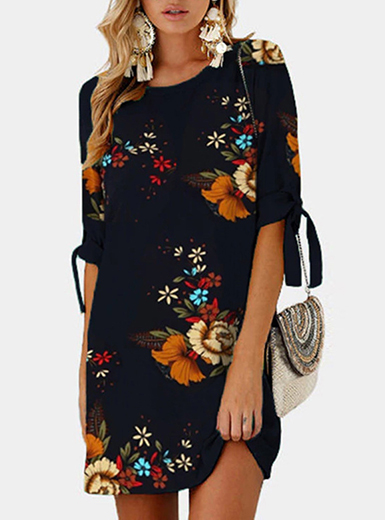
I wanted an easy-to-make summer suit, one that I could wear together or mix the pieces into my wardrobe. I picked Simplicity 8891. The thing about "easy" is that it can possibly mean painfully plain. And that's how I felt about this pattern. It's simple, but it has good details. I knew it needed some zhushing up.

My fabric is this incredible Italian Canary and Moonstruck Double-Faced Stretch Cotton Twill. This fabric is super soft and has a real comfortable amount of give. It feels like a double knit and it has a really good bottom weight. Really good for a body con dress or fitted pants. I pre-treated the fabric in the washer and dryer. It came out pretty wrinkled. But after a good pressing, it was beautiful.

For the jacket, I cut the size 14 and graded out to the 16 at the hip and added 1 inch to the length. I decided to use the decorative stitches instead of basic topstitching.

I picked this diamond looking 7mm satin stitch which I felt would really pop using embroidery thread.

Using the Edit/Stitch switching key and selecting the elongation key to make the pattern shorter and the single/repeat key to indicate that I wanted this to be a continuous stitch and not just a single pattern. I pressed the memory key (the pocket) to save it, so I wouldn't have to go through all of these adjustments each time, because I was going to be using this stitch throughout this project.

I'm really loving the detail that it added to the jacket.

I used the decorative satin stitching to tack down the pleats in the front and the back.

Additionally, I created a belt. I'm not the biggest fan of self tie belts, so I wanted to make a real belt. I interfaced with weft fusible to give it body and carried out the decorative stitching too.

I've seen the eyelet stitch before, but I never thought to actually use it or what it was for.

The 7mm width is perfect for stabilizing metal eyelet installation.


For the shorts, I cut the size 16 and made a 1.5 inch full butt adjustment. I really like the length that they are straight out of the envelope.

This is how I used the decorative stitching on the shorts.

I really love both of these pieces and I can't wait to work them throughout my wardrobe.


18 comments
Absolutely stunning!
ReplyDeleteThank you Brenda!
DeleteI have lots of decorative stitches on my B740 but really haven't figured out how to use them without being craftsy. You, on the other hand have managed to do it perfectly! Fabulous outfit and great inspiration.
ReplyDeleteNancy, that's how I'd always perceived the stitches too. Thanks so much!
DeleteI have never wanted an embroidery machine after seeing an employee at a fabric store who obviously had recently acquired one. I don't remember exactly what she was wearing but I do remember how much it looked like a craft project. She went way too far, she ruined a perfectly nice outfit with embroidery.
ReplyDeleteYour outfit is the exact opposite. The embroidery is subtle and enhances the garments, and in no way looks homemade. It's gorgeous. Brava!
Damn. Now I want an embroidery machine.
Thank you Elle!
DeleteIt looks amazing on you!!!!!!!!!!!!!!!!
ReplyDeleteThank you so much Vanessa!
DeleteI love how you "popped" the suit with the decorative stitches - really clever. Would you explain more about how you did the full butt adjustment - I'd appreciate it. Thanks again for sharing.
ReplyDeleteThank you. I've posted about it before. You can go over to the right side of the sidebar and just search for that to see pictures. It's one of my common adjustments that I make on every single pair of pants, so I don't repetitively post pictures of the same adjustment every time.
DeleteHi, thank you for responding to my question - I appreciate it. I've been trying to find it -- I go to the search bar - I type in "full butt adjustment", "full seat adjustment" but nothing happens. If you would be able to remember which month you might have done it -- I'll look it up by the month, because for me the search bar doesn't appear to be working, or perhaps I'm putting in the wrong title for the search. Thanks for your assistance.
DeleteHere’s one: www.ericabunker.com/2018/05/review-vogue-9321-tie-back-jumpsuit.html?m=1
ReplyDeleteHere’s another: www.ericabunker.com/2017/11/jeans-bodysuit-might-be-my-new-uniform.html?m=1
Thank you! Thank you! This is exactly what I needed. I learn by both words and pictures and these do the trick. Soon as I find that Vogue pattern, I'm going to sign up for your pants course. Thanks again.
ReplyDeleteThank you so much Rickey!
DeleteErica impeccable! If I didn’t know any better I would say this outfit came from a high end store. You’re work is amazing. God bless
ReplyDeleteThank you!
Deleteyou always take it to the next level... thats why your the God Mother!!!!
ReplyDeleteThank you Lilly!
Delete